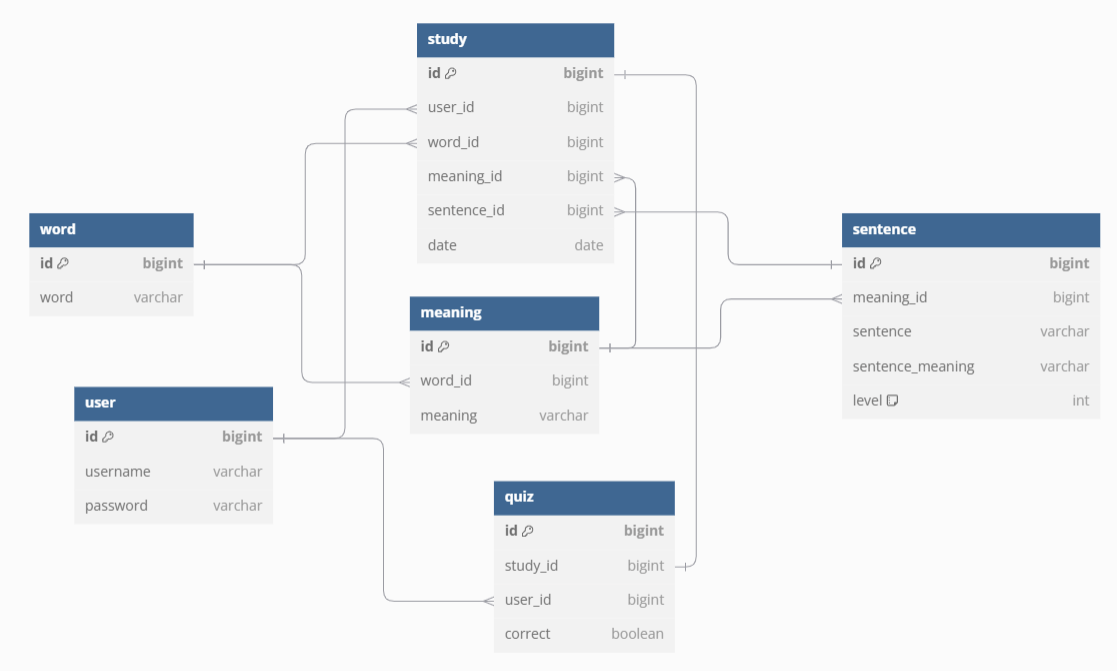
Quiz 저장하기
Quiz 저장하기
Quiz 기능을 구현하기 위해 데이터를 저장하고 조회하는 과정을 진행했다.
이 글에서는 저장 과정을 중점적으로 다루며 조회 기능은 다음 글에서 확인 할 수 있다.
Quiz 저장
Quiz는 사용자가 학습한 단어를 기반으로 생성된다.
저장 방식 설계 시 두 가지 방안을 검토했다.
1. Quiz 테이블의 status 활용
Study 테이블에서 단어를 가져오고 Quiz 테이블에 정답 여부인 status(correct,incorrect)를 반영한다.
2. Study와 User를 연결
study_id와 user_id를 Quiz 테이블에 저장하고 정답 여부를 Boolean 값으로 관리한다.
나는 후자의 방법을 선택했다.
Quiz db 저장하기
Entity
1
2
3
4
5
6
7
8
9
10
11
12
13
14
15
16
17
18
19
20
21
22
23
24
25
26
27
28
29
30
31
32
@Entity
@Getter
@NoArgsConstructor(access = AccessLevel.PROTECTED) // builder
public class Quiz {
    @Id @GeneratedValue(strategy = GenerationType.IDENTITY)
    private long id;

    @OneToOne(fetch = FetchType.LAZY)
    @JsonIgnore
    @JoinColumn(name="study_id")
    private Study study;

    @ManyToOne(fetch = FetchType.LAZY)
    @JsonIgnore
    @JoinColumn(name = "user_id")
    private User user;

    @Column
    private boolean correct;

    @Builder
    public Quiz(Study study) {
        this.study = study;
        this.correct = false;
    }

    public static Quiz addQuiz(Study study) {
        return Quiz.builder()
                .study(study)
                .build();
    }
}
사용자별로 퀴즈를 생성하고 퀴즈는 학습한 기준으로 생성하기 위해 User와 Study를 추가했다.
user_id → @ManyToOne : 한 사용자가 여러 개의 Quiz를 생성 가능
study_id → @OneToOne : 각 Study에 대해 Quiz는 한 번만 생성 가능
부모-자식 관계의 삭제 처리
| 특징 | CascadeType.REMOVE | orphanRemoval=true |
|---|---|---|
| 부모 엔티티 삭제 | 부모 삭제 시 자식도 삭제됨 | 부모 삭제 시 자식도 삭제됨 |
| 부모 관계 끊길 시 | 자식 데이터는 db에 남음 | 관계가 끊긴 자식도 삭제됨 |
orphanRemoval=true를 사용하여 관계가 끊긴 자식도 삭제되도록 설정했다.
orphanRemoval=true는 부모 entity에만 설정해야한다.
1
2
3
4
5
6
7
8
9
10
11
12
13
14
15
16
@Entity
@Getter
public class User {
    @Id @GeneratedValue(strategy = GenerationType.IDENTITY)
    private Long id;

    @Column
    private String username;

    @Column
    private String password;

    @OneToMany(mappedBy = "user", cascade = CascadeType.REMOVE, orphanRemoval=true)
    @JsonIgnore
    private List<Quiz> quizList = new ArrayList<>();
}
db 설계
초기 설계
1
2
3
4
5
6
CREATE TABLE quiz(
    id BIGINT AUTO_INCREMENT PRIMARY KEY,
    study_id BIGINT NOT NULL,
    correct BOOLEAN DEFAULT false,
    FOREIGN KEY (study_id) REFERENCES study (id) ON DELETE CASCADE
)
correct의 기본 값은 false로 설정했다.
수정 : 사용자별 데이터 관리 추가
user_id 를 추가해 사용자별로 Quiz를 괸리할 수 있도록 적용
1
show create table quiz;
출력 값 🔽
1
2
3
4
5
6
7
8
CREATE TABLE `quiz` (
  `id` bigint NOT NULL AUTO_INCREMENT,
  `study_id` bigint NOT NULL,
  `correct` tinyint(1) DEFAULT '0',
  PRIMARY KEY (`id`),
  KEY `study_id` (`study_id`),
  CONSTRAINT `quiz_ibfk_1` FOREIGN KEY (`study_id`) REFERENCES `study` (`id`) ON DELETE CASCADE
)
1
2
3
4
5
ALTER table quiz ADD COLUMN user_id BIGINT not null;
UPDATE quiz set user_id=1 where quiz.user_id=0;
alter table quiz add foreign key (user_id) references user (id) on delete cascade;
ALTER TABLE quiz DROP FOREIGN KEY quiz_ibfk_1;
alter table quiz add unique (user_id, study_id)
Batch Insert와 saveAll()
Study에 값을 저장할 때 같이 Quiz도 저장하면서 성능이 좋을까에 대해 의문이 생겼다.
Study의 id값을 가져와서 그 값을 Quiz에 저장을 하기 때문에 최대한 성능을 좋게 하고 싶었고
그 과정에서 Batch Insert를 알게되었다.
save()와 saveAll()
여러 건의 데이터를 insert 할 때는 saveAll()를 사용하는 것이 성능상 더 좋다.
그 이유는 @Transactional 때문이다.
트랜잭션에서 다른 트랜잭션이 호출될 때 어떤 방식으로 처리할지 결정하는 것을 ‘트랜잭션의 전파 설정’이라고 한다.
여기서 save()와 saveAll()의 @Transactional 전파 속성은 default 속성인 ‘REQUIRED’가 적용되어 있다.
REQUIRED의 경우 별도의 트랜잭션이 설정되어 있지 않다면 새로운 트랜잭션을 생성하고
트랜잭션이 설정되어 있다면 해당 트랜잭션을 재사용한다.
save() : 개별적으로 엔티티를 저장
각 호출 마다 entity의 기본 키(@Id)를 통해 새로운 엔티티인지 isNew()를 통해 확인한다.
saveAll() : 여러 entity를 한 번에 저장
내부적으로 save()를 반복 호출하지만 트랜잭션 전파 속성(REQUIRED) 덕분에 부모 트랜잭션을 재사용한다.
Entity State Detection Strategies
Spring Data JPA는 엔티티가 새로운지 확인하기 위한 여러 방법을 제공한다.
The following table describes the strategies that Spring Data offers for detecting whether an entity is new:
| Option | Description |
|---|---|
@Id-Property inspection (default) | By default, Spring Data inspects the identifier property of the given entity. If the identifier property is null or 0 in case of primitive types,then the entity is assumed to be new. Otherwise, it is assumed to not be new. |
@Version-Property inspection | If a property annotated with @Version is present and null,or in case of a version property of primitive type 0the entity is considered new. If the version property has a value, it is not new. If no version property is present, Spring Data falls back to the identifier property. |
| Implementing Persistable | If an entity implements Persistable, Spring Data delegatesthe new detection to the isNew(…) method of the entity.See the Javadoc for details. Note: Properties of Persistable will get detected and persisted if you use AccessType.PROPERTY.To avoid this, use @Transient. |
| Custom EntityInformation implementation | You can customize the EntityInformation abstraction by creatinga subclass of the module-specific repository factory and overriding the getEntityInformation(…) method.You then have to register the custom implementation of the repository factory as a Spring bean. Note: This is rarely necessary. |
docs.spring.io에서 확인할 수 있다.
Spring Data JPA는 엔티티가 새로운지 확인하기 위해 isNew() 메서드를 호출한다.
1
2
3
4
5
6
7
8
9
10
11
12
13
14
15
16
17
18
19
20
21
22
23
24
25
// SimpleJpaRepository.class
   @Transactional
    public <S extends T> S save(S entity) {
        Assert.notNull(entity, "Entity must not be null");
        if (this.entityInformation.isNew(entity)) {
            this.entityManager.persist(entity);
            return entity;
        } else {
            return (S)this.entityManager.merge(entity);
        }
    }

// AbstractEntityInformation.class
    public boolean isNew(T entity) {
        ID id = (ID)this.getId(entity);
        Class<ID> idType = this.getIdType();

        if (!idType.isPrimitive()) { // wrapper class인 경우
            return id == null;
        } else if (id instanceof Number) { // primitive type인 경우
            return ((Number)id).longValue() == 0L;
        } else {
            throw new IllegalArgumentException(String.format("Unsupported primitive id type %s", idType));
        }
    }
entityInformation.getId(entity)를 통해 엔티티의 ID 값을 가져온다.
- ID 타입 확인
ID 타입이 primitive(기본형)(long, int, …) 이면 0L인지 확인
ID 타입이 wrapper Class(Long, Integer, …) 이면 null인지 확인
새로운 엔티티 판별
ID가 null이거나 0L인 경우: 새로운 엔티티로 간주하고
persist()를 호출한다.ID가 존재하는 경우: 기존 엔티티로 간주하고
merge()를 호출한다.
save()의 경우 트랜잭션 오버헤드가 발생하며 대량 데이터 저장 시 성능 저하 가능성이 있고
saveAll()은 부모 트랜잭션을 재사용하므로 여러 엔티티를 효율적으로 저장해 대량 데이터 처리에 유리하다
Batch Insert
Batch Insert는 여러 데이터를 한 번에 삽입하는 방법이다.
1
2
3
4
5
6
7
8
9
10
11
// 개별 Insert
INSERT INTO table (col1, col2) VALUES (val1, val11);
INSERT INTO table (col1, col2) VALUES (val2, val22);
INSERT INTO table (col1, col2) VALUES (val3, val33);


// Batch Insert
INSERT INTO table (col1, col2) VALUES
(val1, val11),
(val2, val22),
(val3, val33);
IDENTITY 전략은 데이터베이스가 기본 키(PK)를 자동으로 생성하는 방식이다.
INSERT SQL 실행하고 DB에서 식별자를 조회할 수 있다.
Hibernate는 보통 데이터를 DB에 저장할 때 Transactional Write Behind라는 쓰기 지연 방식을 사용한다.
persist()를 호출하면 Hibernate는 INSERT SQL을 즉시 실행하지 않고
쓰기 지연 SQL 저장소에 해당 SQL을 보관한다.
트랜잭션이 커밋되는 시점에 한꺼번에 DB에 반영한다(이 과정을 flush라고 한다).
IDENTITY 전략을 사용하면 Batch Insert는 동작하지 않는다.
IDENTITY 전략에서는 persist() 호출 시 Hibernate가 즉시 DB에 INSERT SQL을 실행해야 한다.
DB에서 생성된 ID 값을 Hibernate가 즉시 알아야 하기 때문이다.
이 과정에서 Hibernate의 쓰기 지연 방식(Transactional Write Behind)과 충돌한다.
쓰기 지연 방식은 나중에 한꺼번에 DB에 반영하려고 하지만
IDENTITY 전략은 persist() 시점에 바로 DB에 값을 넣고 ID를 가져와야 한다.
따라서 Hibernate는 IDENTITY 전략에서 쓰기 지연을 제대로 활용할 수 없다.
테이블 전략을 변경하는 방법이 있지만 다른 대안인 JdbcTemplate를 사용하여 Batch Insert를 적용했다.
JdbcTemplate를 사용하여 Batch Insert 적용하기
1
2
3
4
5
6
7
8
9
10
11
12
13
14
15
16
17
18
19
@Repository
@RequiredArgsConstructor
public class JdbcRepository {
    private final JdbcTemplate template;

    public void batchInsert(List<Quiz> quizList) {
        // 1. Insert SQL 정의
        String sql = "INSERT INTO quiz (study_id, correct, user_id) VALUES (?, ?, ?)";

        // 2. Batch Insert 실행 (sql, batchArgs, batchSize, sql ?에 들어갈 값)
        template.batchUpdate(sql, quizList, quizList.size(), (ps, quiz) -> {

            // PreparedStatement의 각 파라미터 설정
            ps.setLong(1, quiz.getStudy().getId());   // Study의 ID 설정
            ps.setBoolean(2, quiz.isCorrect());       // Correct 상태 설정
            ps.setLong(3, quiz.getUser().getId());    // User의 ID 설정
        });
    }
}
saveAll에 비해 성능이 좋은지 실제 application을 실행하면서 시간을 측정해봤다.
시간 단위는 나노초이며, 데이터 10번 저장을 5번 실행해 정리했다.
| Batch Insert | saveAll |
|---|---|
| 19426400 | 14945400 |
| 5702800 | 11311400 |
| 8972900 | 13566300 |
| 7505200 | 10237300 |
| 7945800 | 11400300 |
가장 오래 걸렸던 시간은 각각 0.019426초, 0.014945초 였고
가장 짧게 걸렸던 시간은 각각 0.0057028초, 0.010237초 였다.
saveAll() 보다 Batch Insert가 평균적으로 더 빠른 성능을 보였기 때문에 Batch Insert로 적용했다.
Test 코드 작성
테스트 환경 설정 변경
1. IntelliJ IDEA 변경
Gradle로 되어있어서 IntelliJ IDEA로 변경
2. gradle 확인
1
2
3
4
5
6
7
8
9
// 변경 전
tasks.named('test') {
    useJUnitPlatform()
}

// 변경 후
test {
    useJUnitPlatform()
}
위 설정을 제대로 하지 않으면
Execution failed for task ‘:test’. > There were failing tests. See the report at: 와 같은 오류가 뜬다.
-parameters 옵션 설정
TEST 코드를 실행하기 위해서 IntelliJ IDEA로 변경했었다.
이렇게 변경 하고 나니 application 실행 할 때 아래와 같은 오류가 떴다.
Name for argument of type [java.lang.String] not specified, and parameter name information not available via reflection.
Ensure that the compiler uses the ‘-parameters’ flag*
찾아보니 Gradle을 사용하면 -parameters 옵션이 자동으로 적용되는데 IntelliJ IDEA는 자동이 아니라서 생긴 문제였다.
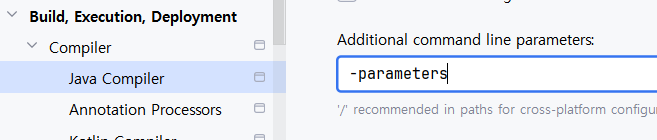
위와 같이 적용 후 /out 폴더를 삭제 후 컴파일되며 옵션을 적용시킨다.
REFERENCE
save와 saveall
Batch Insert
- Spring JDBC를 사용하여 Batch Insert 수행하기
- [Batch Insert] 대량 데이터 Insert 성능 최적화 (JPA batch size / JDBCTemplate batch Insert / Mybatis batch Insert)
Test
오류 Name for argument of type [java.lang.String] not specified